I just tried the
"upside down and backwards" method of mitering inside crown molding corners. It worked out fine without a compound miter saw. Search around the net for many more links on this method.
My problem was how to make a series of cuts that line up perfectly when mated in an 12' stick of molding while holding it at an angle against the box wall with one hand. It felt guaranteed to walk around and wreck the run.
I'm no expert, in fact this was my first time, but here's what I learned in case it helps someone. YMMV.
Use MDF crown molding, not pine. It's flexible and cuts very cleanly without splintering. This helped make a sharp joint. See in the sample below, a quick smear of caulk and paint and it disappeared.
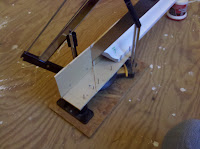 Use a jig.
 I built a physical jig to hold the work for the miter saw. I used a $20 Jorgensen miter box, which turned out to be very decent for general use.
Here's what it looked like before I messed with it (that page was also complimentary about the same model). The box has a mounting flange, which I bolted to some scrap wood to let it be clamped in a portable bench vise. Then I screwed some 1/8" plywood to the back and bottom, right into the plastic of the box, countersinking the screws. Next, I made two 45-degree cuts to clear out the plywood where the saw would normally cut. Finally, I held a scrap of crown carefully at the angle it would rest on the ceiling (remember, upside down and backwards) so the back and bottom were seated well to the base all around, and ran a line of finish nails through the wood and down into the plastic. This line of nails helps holds the work firmly, so it can be cut with one hand while holding with the other. Some boxes have a row of holes for dogs for this same purpose.

Caulk and paint are your friends. Joints won't be perfect. Walls won't be straight, square and plumb. By the way, the molding came primed. I painted it once on the floor before cutting, then after it was finished and caulked, to hide the nail holes and joints.
Be prepared for weirdness. This ceiling was so low, it left no room near the door frame. A "return", or end cap, was the simple answer. This is cut just like an outside corner, with a square end to the wall.


 Use a jig. I built a physical jig to hold the work for the miter saw. I used a $20 Jorgensen miter box, which turned out to be very decent for general use. Here's what it looked like before I messed with it (that page was also complimentary about the same model). The box has a mounting flange, which I bolted to some scrap wood to let it be clamped in a portable bench vise. Then I screwed some 1/8" plywood to the back and bottom, right into the plastic of the box, countersinking the screws. Next, I made two 45-degree cuts to clear out the plywood where the saw would normally cut. Finally, I held a scrap of crown carefully at the angle it would rest on the ceiling (remember, upside down and backwards) so the back and bottom were seated well to the base all around, and ran a line of finish nails through the wood and down into the plastic. This line of nails helps holds the work firmly, so it can be cut with one hand while holding with the other. Some boxes have a row of holes for dogs for this same purpose.


